The life of a Linux user can be a bit difficult. Sometimes you have to — or want to — run Windows. Why Windows? Sometimes you have a work computer or a laptop that Linux doesn’t support well. Or it might be software. Although there are plenty of programs that can edit, say, Word documents, there’s always that one document that doesn’t quite translate correctly. Things like videoconferencing software sometimes works on Linux but might have fewer features.
So what do you do? You can dual boot, of course, but that’s not very handy. You can run Windows in a virtual machine if you have enough horsepower. There’s also Wine, but that often has its own set of problems with features and stability of complex programs. However, recent versions of Windows provide the Windows Subsystem for Linux (WSL).
With WSL, you can have most of what you like about Linux inside your Windows session. You just have to know how to set it up, and I’m going to show you one way that works for me with reasonably stable versions of Windows 10.
About WSL
WSL is pretty powerful since it gives you a good Linux environment and it is tightly optimized with Windows. However, there are a few caveats. WSL actually has two variants. The first, version 1, works well enough, but doesn’t have complete compatibility and has slower disk I/O speeds. Most normal programs will work, but things like Docker and FUSE won’t. Version 2 requires virtualization support on your computer, but operates much much faster. It also provides a real Linux kernel, so most everything will run using WSL2.
If you are willing to take the recent developer versions of Windows 10 you can even run graphical programs if you are willing to run that far beyond the edge. But turns out, you don’t have to use the developer version at all. If there’s one thing X is good at, it is having a server running on one machine and clients running on another. So there’s no reason you can’t run X clients inside WSL and use a Windows-based X server to display.
First, Get an X Server
There’s no shortage of Windows-based X servers both free and commercial. I used Cygwin’s and, more specifically, I used a preconfigured Cygwin X11 setup called Swan. Unfortunately, the Swan project seems defunct, but Cygwin still exists and works fine.
 Another option is VcXsrv and several other similar projects. The best part about these is they don’t have a lot of superfluous stuff. Cygwin has lots of things that, normally, will be very useful, but those things will be duplicates of what you will want to install under WSL.
I suggest you get the X server running first and test it out from another Linux machine or a virtual machine. If you have a system like Cygwin, you can just run native apps. If your X server doesn’t work for some reason, WSL won’t be able to use it either.
Version 2 for Performance
If you’ve used WSL for a bit, you should check to see if you are still using version 1. You can pretty easily switch between versions and even have multiple installations with different versions. To figure out which you have, open a PowerShell as an administrator:
wsl --list --verbose
You should see a line for each Linux distro you have installed and a version number. If you have version 1, make sure you have virtualization support turned on in your BIOS and also make sure the “Virtual Machine Platform” Windows feature is turned on. Then enter:
--set-version Ubuntu 2
Of course, use whatever name you saw in the list which may or may not be “Ubuntu.” This will take a bit of time or you will get an error message if you don’t have the BIOS and Windows settings right. You may also get some directions to download some updated kernel support. Just follow the instructions. If the command doesn’t take a bit to run, it probably is complaining about something not set up correctly. You can verify it with the list command again.
The version is important because the networking setup is different from the old version. While it is possible to configure the older WSL the same way, you might as well enjoy the performance increase. However, if your machine or OS don’t meet the requirements, you might have to stick with version 1.
You can also set version 2 to be the default from PowerShell:
wsl --set-default-version 2
If you happen to be running Windows 10 version 2004 or later, it is easier to install wsl now. However, you still want to make sure you are running version 2.
Connectivity
X11 clients know how to reach their display via the DISPLAY variable. Normally, you’ll see it set to :0 or :0.0 and that’s understood to be the first screen on the current machine. That won’t work here, though, because WSL is on a virtual network that isn’t the same as your Windows OS.
There are basically three steps you’ll need to work through to get things to work:
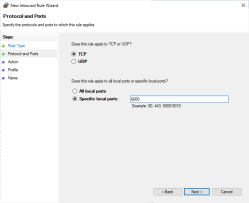
- Open port 6000 on your PC firewall, if you use one
- Tell the X server to allow connections from a different computer (in this case, a virtual computer)
- Set the DISPLAY variable to point to the WSL address that corresponds to the Windows computer
The exact steps will depend on what firewall and server you use. However, the general steps are the same for any tool you happen to use.
 If you use the Windows Defender firewall you can open port 6000 by searching settings for Windows Defender Firewall. Select Advanced and then create a new inbound rule for TCP port 6000. However, Windows may pop up a firewall window the first time you run the server asking you if you want to allow connections. In that case, you probably won’t have to configure the firewall manually.
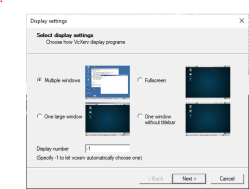
Setting access control for your X server will depend on the server you use. For Cygwin, try running xhost + from a Cygwin prompt. For VcXsv, you’ll want to check the startup option that allows external connections. You may not like the idea of opening up your X server, but if you can restrict your firewall settings or use an XAuthority file. First, get it working, then you can tighten up security. If you are behind a home router you can block things using its firewall.
The DISPLAY variable is the easiest of them all. A quick way to learn the Windows IP address from the WSL side is to look at how the nameserver is set. Dump /etc/resolv.conf and you should see something like this:
# This file was automatically generated by WSL. To stop automatic generation of this file, add the following entry to /etc/wsl.conf:
# [network]
# generateResolvConf = false
nameserver 172.25.32.1
This means the DISPLAY variable should be set to 175.25.32.1:0.0 like this:
export DISPLAY=175.25.32.1:0.0
You could automate this with, say, awk but remember a proper shell script won’t set your environment. You’d need to source the script to allow that. For example, here’s a script that resides in /usr/local/bin/setWinX:
WINIP=$(awk '/^nameserver / { gsub("nameserver ",""); print; }' /etc/resolv.conf)
export DISPLAY="$WINIP:0.0"
You could, of course, arrange for that to run on startup, too by sourcing it from .profile:
source /usr/local/bin/setWinX
Depending on your X server and applications you might need to coax programs to use particular output drivers. For example, I’ve heard that this line will fix some problems:
export LIBGL_ALWAYS_INDIRECT=1
Once you have nice Linux/Windows integration, you can add some launcher support. Set your X server to autostart and you can merrily mix and match Windows and Linux apps on the same screen.
Unfair!
It hardly seems fair. Getting Windows stuff to run under Linux is tricky because Windows is closed. Making Linux run under Windows is much easier because Linux is open. Of course, sometimes you really have to run Linux for real. For example, I needed to directly read a mouse and found that the way WSL routes input events isn’t much like a regular Linux installation. Still, it works awfully well and performs nicely, too.
This isn’t the first time we’ve looked at WSL and that post has some good tricks if you are just starting out. How do you deal with using Windows and Linux? The ideal answer is you don’t and you just stick with one or the other. But tell us what you are doing in the comments.
0 Commentaires