Need some kind of battery for a project? You can always find a few Lithium-Ion (LiIon) batteries around! They’re in our phones, laptops, and a myriad other battery-powered things of all forms – as hackers, we will find ourselves working with them more and more. Lithium-Ion batteries are unmatched when it comes to energy capacity, ease of charging, and all the shapes and sizes you can get one in.
There’s also misconceptions about these batteries – bad advice floating around, fearmongering videos of devices ablaze, as well as mundane lack of understanding. Today, I’d like to provide a general overview of how to treat your LiIon batteries properly, making sure they serve you well long-term.
What’s A Battery? A Malleable Pile Of Cells
Lithium-Ion batteries are our friends. Now, there can’t be a proper friendship if you two don’t understand each other. Lithium-Ion batteries are tailored for human needs by the factory that produced them. As for us hackers, we’ll want to learn some things.
First thing to learn – a single LiIon “unit” is called a cell. An average laptop contains three or six Li-Ion cells, a phone will have one, a tablet will have from one to three. What we refer to as “battery” is typically one or multiple cells, together with protection circuitry, casing and a separate connector – most of the time all three of these, but not always. The typical voltage is 3.6 V or 3.7 V, with maximum voltage being 4.2 V – these are chemistry-defined, the same for most kinds of cells and almost always written on the cell.
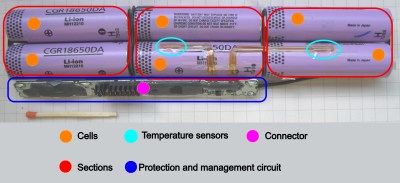
In multiple-cell batteries, the cells are arranged into a mixture of parallel and series arrangements, called a ‘configuration’. For instance, a typical 6-cell laptop battery could be described as a “3s2p” configuration, meaning “three sections in series, in which each section consists of two cells in parallel”. The voltage of such a battery is typically described as one of the battery voltages multiplied by number of series stages; a 3sXp battery voltage could be labelled as 10.8 V, 11.1 V, or 12.6 V.
Parallel cells can be functionally treated as a larger-capacity cell – for instance, if you have two 1000 mAh cells and you need 2000 mAh capacity, you can connect the two cells in parallel and get exactly what you need. Make sure not to parallel cells of significantly different capacity – then, one of those will take more charging current than it perhaps should. This arrangement has one problem: if one of the cells fails internally and starts self-discharging, it brings all the other parallel-connected healthy cells down as well. You might have encountered this failure mode if you have ever disassembled a dead laptop battery.
Shapes And Sizes, All The Same
There’s different physical form-factors for cells – cylindrical, pouch cells and prismatic. 18650 is the most popular cylindrical cell format, where 18 stands for diameter and 65 stands for length (in millimeters). These kind of cells, you’ll typically see in laptop and powertool batteries, electric transportation devices of all kinds.
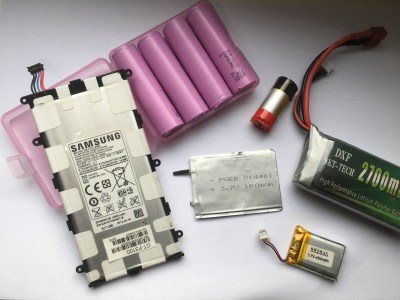 Pouch and prismatic cells are typically rectangular, with exceptions like cylinder-shaped cells in disposable vapes. These, you’ll see in phones, thinner laptops, tablets, and in general all kinds of handheld devices. I’ll refer to rectangular form-factor cells as “pouch cells” interchangeably.
You’ll often see the term “LiPo” being used online when talking i.e. copter batteries, or just some pouch cells. LiPo technology is a subset of LiIon technology, typically indeed packaged into pouch cells, and is the same as LiIon for the purposes of this article. LiFePO4 is also a subtype of LiIon, it differs by some important aspects like voltages, but most of this article will apply still.
No matter which kind of LiIon cells you’re using, whether a 18650, some “LiPo” single-cell pack, or a pouch cell you took out of a dead smartphone, the electronic components required generally stay the same – mostly thanks to voltages involved being the same. For instance, if you have an ESP32 board with a JST-PH 2-pin input for a battery, it’ll function whether you have a 18650 in a holder with soldered wires, or a pouch cell you got from Adafruit. It isn’t arcane magic – you only have a few rules to follow. Here’s everything you’d ever want to know.
Bring Your Multimeter Out
 LiIon batteries don’t like being overdischarged; as a rule, you don’t want to get a LiIon battery below 2.5 V – 3.0 V, depending on how much current you’re trying to draw at that voltage. Below a certain voltage, LiIon batteries suffer irreversible changes and lose their capacity. 3.0 V is my personal threshold, making sure my batteries last even longer. No, it’s not a requirement that you add an ADC to your payload – just make sure your battery has a protection circuit; those typically are set to protect from 2.5 V overdischarge, and you can get 3.0 V ones too if you’d like.
If you go gently on discharge, your battery will live longer. This is why your phone’s “0% battery” isn’t the real 0% of the battery’s capacity – there’s usually some juice left still, but using it up would have the battery capacity take a hit long-term. This is also why some laptops have a BIOS-accessible 80% battery charge level limitation for the purpose of extending the pack’s life expectancy – you trade some operational capacity for that, but it’s a worthwhile tradeoff to consider.
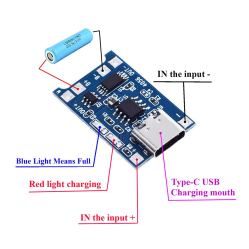
LiIon batteries want to be charged properly. You’ll see CC/CV mentioned – that refers to “constant current/constant voltage”, where first the battery is fed a constant current with the cell increasing its voltage as it charges, and once its voltage reaches some threshold, the charging mode is switched to keep the charging voltage somewhat constant and decrease the current over time instead. This two-stage charging process requires a charging IC – thankfully, those are omnipresent. If you have a device accepting a LiIon battery, it likely has an onboard charger; for your own devices, chargers are easy to find as modules.
When working with a small cells under 1000 mAh, you’ll want to ensure your charging current is half of the battery capacity number, or even less – so, for a 1000 mAh cell, it’d be 0.5 A or lower. For instance, the everpresent TP4056 modules are set up for 1 A current. Say, you tried to charge a 100 mAh battery with that – this is one of the rare cases where the cell might get fiercely dissatisfied with your treatment. Thankfully, for the blue “TP4056” modules, swapping a resistor is all it takes – and TP4056 boards often include a protection circuit as well!
Protection And Monitoring
Remember – LiIon cells can put a lot of current into whatever you connect to their terminals. When working with unprotected cells, it’s important that you don’t short them by accident. For instance, if you’d like to repair a powerbank, unsolder the negative terminal first – just like with car batteries. This will decrease the chances of you shorting the positive pin to to ground with your soldering iron – that would trip the protection circuit, cause a small spark, and possibly make your battery lose some of its capacity. This is one more reason why you have a protection circuit – these trip on overcurrent events.
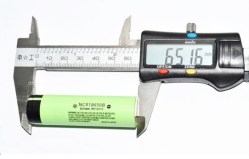
Let’s recap: with a single-cell (or single-stage) battery, you’ll want a protection circuit, and there’ll be a charger somewhere in the picture. For LiIon packs where multiple cells are connected in series, you’ll want a protection circuit that’s wired into between-cell connections, for proper overdischarge monitoring – and you’ll also want some form of balancing wired into these, making sure that individual sections of the battery don’t overcharge. This protection+balancing circuitry combination is often referred to as “BMS” (battery management system).
If you end up having quite a few unused batteries or cells lying around, there’s something you could improve upon. It’s been found that you shouldn’t store your batteries long-term at 100% charge, as that might cause capacity loss – 50-60% charge is a better level for storage. So, if you want to put your cells on a shelf for a few months or more, it’s best if you get them to 3.8 V-3.6 V first. Not that full charge storage is going to kill your battery – can’t deny, I’ve been storing most of my cells fully charged and it hasn’t been a dealbreaker so far. This is a lot more of a concern for LiPo pouch batteries than LiIon cells.
Mechanical Manipulations
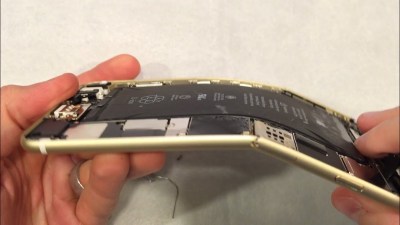
If you ever need to use blunt force to remove a glued-in cell, use non-sharp plastic tools instead of metal ones – and try to find a different way first. Let’s say, you want to free a pouch cell from an old tablet. First, try to squirt liberal amounts of isopropyl under the battery and let it soften, and twist the cell instead of bending it – you might find that you don’t need any tools at all. If you do need to pry the cell with something, use a cut up old credit card. Heating (i.e. hairdryer) is generally advised against.
One thing I strongly recommend you avoid is puncturing a puffed up pouch cell. Of course, sometimes a puncture happens by accident when refurbishing things, and you’re going to be fine if you move away from the cell for a bit, but don’t go around poking holes in spicy pillows for fun.
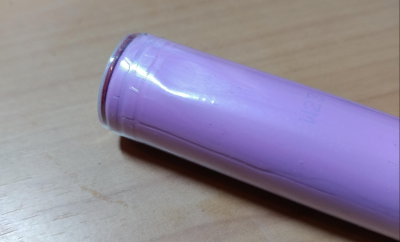
For 18650 (cylindrical) cells, it’s harder to puncture them, but still possible. One of these cases is taking a laptop battery apart, cutting through the battery case plastic with sharp metal tools – beware! The case is the negative terminal, so if you nick the shrink wrap, don’t make contact with the positive tip. However, if your 18650 plastic covering is missing or torn, that’s fine – it’s just a special kind of heatshrink, you can buy it for cheap and put it on the cell with hot air.
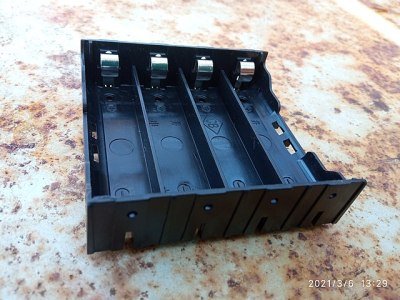
If you want to use 18650s in your own creations, you’re best off stocking up on holders, or printing some. The second best thing is spot welding metal strips onto them – some shops will do that for you, – and soldering wires to these. Soldering directly to 18650 cells is a tricky topic. The consensus is that it can be done, but it’s best if you don’t.
Applying heat to 18650 cell casing is best done in small amounts – as such, using a higher-power soldering iron for short amounts of time is probably the safest way you can do it. Perhaps one of your friends or a nearby hackerspace has a spot welder that you can use instead – or you can build your own?
Storing cells and batteries long-term isn’t rocket science – a free shelf will do. Make sure that they’re not mechanically at risk, aka they won’t fall, nothing heavy/sharp is on them, yadda yadda. For pouch cells without protection circuits, you’ll want to wrap the exposed terminals in something like kapton tape while they’re being stored, and put them somehwere fire-safe just in case. For 18650s, there’s cheap plastic cases you can store them in. Ammo boxes might be tempting, but make sure the metal doesn’t short the cells out as they rattle inside.
Be Picky When Making Friends
As hackers, we can get LiIon cells from a myriad of different sources. This is wonderful, since our projects come in all shapes and sizes – some will be fine with 18650, some can be powered by a smartphone battery or an ultrabook-scavenged flat cell, some are small enough that perhaps a vape battery will be a better bet.
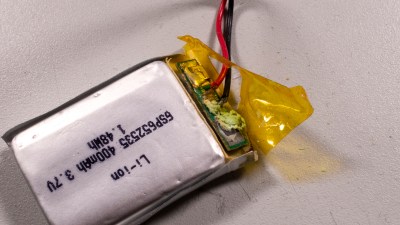
Not all of these cells will be good for you, however – there’s some easy indicators that the cell is subpar and perhaps internally damaged, and these signs, you should watch out for. I’ll give you an acronym – L.U.S.H., which stands for “Lacerated, Undervolted, Subpar, Heated”.
Is the silver wrapper of your pouch cell cut? Is your 18650 dented on its side? Did you mishandle an RC car LiPo pack and now it’s squished together in the way it wasn’t before? If so, recycle it rather than reusing it. It’s okay to have a bit of a dent on your 18650’s negative terminal as you use tin snips to get rid of spot-welded strip remains. Other than that, there’s typically not a lot of mechanical leeway between the side wall of the cell and its internal layers of electrodes, and squeezing these layers together is a possible failure point.
If the cell is lower than 2.5 V, bin it. In case your cell has a protection circuit and that circuit’s output is at 0 V, you might want to measure before the protection circuit, directly on the cell’s contacts – typically gently cutting through kapton or plastic tape where necessary, perhaps using sewing needles held against your multimeter probes. Again, if below 2.5 V, bin it – and consider keeping the protection circuit, it might prove useful later! Also, be reasonable – if you’ve disassembled a laptop battery, where two sections are at 3.5 V and one is at 3 V, you better bin the latter.
Capacity loss means the cell has been damaged, and you don’t want to be using a damaged LiIon cell. For instance laptop battery makers use indicators of cell damage (overdischarge, overcharge and overheating) as a trigger to shut the battery controller down and brick the entire battery – and it makes sense, since they don’t want to have the liability. Even then, overall severe capacity loss isn’t usually considered a trigger for such protection. That said – if a battery has subpar capacity for its size or rating, bin it.
When charging the battery for the first time after it’s freed up from its previous host, make sure it doesn’t heat up noticeably – if it does, bin it. After charging, measure the voltage and write it down. It’s going to gradually decrease after you stop charging, but it shouldn’t drop too much. If it drops more than 0.3 V from where it was after you stopped charging, or just keeps dropping and dropping over the week, bin it – high levels of self-discharge typically go hand in hand with capacity loss.
Wait, What About Those Fires?
The risks of fire with LiIon cell batteries in typical hacker usecases are negligible. After all, we typically have thousands of LiIon cells in our general vicinity – consider all the phones, laptops, electric cars and the like, and they work wonders long-term across thousands of cycles. Typical LiIon fires happen because of mechanical damage to the cell, severe neglect of its electrical requirements, and rarely, mis-manufacturing. Having learned to treat your cells well and bin them when called for, you’re well-equipped to avoid battery fires ever happening. Want to learn more about LiIon battery fire safety specifically? Our colleague has talked about that in depth.
 When you need to dispose of a dead or subpar LiIon battery, are you understandably worried about its terminals getting shorted or the cell getting punctured after you bin it? Good news – a fully discharged battery is completely safe from any accidents, no longer having internal energy for combustion.
How to fully discharge a cell? First, you could short the cell’s terminals with something like a 10 K through-hole resistor and leave it to discharge fully. Make sure to connect to the cell and not the protection circuit output! Another way I’ve seen people do is put the cell (or an entire pack) in saltwater and hold it there for a while – best done outdoors in an open container. This might sound a bit wack, but there’s scientific research aplenty! [Ed note: sounds wack! I just use a resistor.]
Go On, LiIon!
We haven’t always been well-equipped to handle LiIon batteries. It used to be that bargain bin devices used two diodes from a 5 V input to “charge” the battery – resulting in puffy and dissatisfied pouch cells. Nowadays, you’ll see hackers and makers equipping their devices with LiIon batteries left and right, protection boards and chargers are everpresent, and the skills ought to be ubiquitous too. Never stop learning, and you’ll always be equipped to make your projects more portable, failproof and trustworthy.
Next time, I’d like to talk about specifics – I want to give you a hacker-friendly cookbook with LiIon battery electronics examples that are easily repeatable at home. Until then – solder a JST-PH lead onto a smartphone cell and plug it into that ESP32 board you bought, see what that lets you achieve!
0 Commentaires